Up to this point, all the colors used in our examples
have been directly specified within our program code. This gives us a
high level of control over the appearance of the graphics, but leads to a
flat and cartoony look to the graphics. To add a further degree of
realism to the objects that we render, we can use XNA's lighting
features.
This section examines the lighting capabilities and explores how they can be used within our games.
1. Lights and Materials
XNA offers the facility to
place up to three different lights into the game world and use these to
illuminate the objects that are rendered. When lighting is switched on,
the way in which objects are colored is altered from the behavior we
have seen so far. XNA applies lighting to our objects by calculating the
amount and color of light that falls onto each vertex and actually
adjusts the vertex colors based on the result of this.
The outcome is that we can
generate highly dynamic and realistic-looking shading on our objects.
The minor downside is that because XNA implements lighting by taking
control of coloring the object vertices, we can't specify vertex colors
ourselves. We can still apply textures to our objects just as before,
but vertex colors cannot be used.
Although we are no longer
able to directly color vertices, we can still use different colors
within a texture to provide coloring to different sections of our
objects, so this is not necessarily as big a problem as it might at
first sound.
Additionally, the DiffuseColor property can still be used to change the overall color of the objects being rendered. This is also known as the material color
as it defines the color of the object. This works alongside the colors
of lights that we place within the scene, allowing colors of lights and
objects to be set independently. This provides a fair degree of
flexibility with regard to how our objects are lit.
The following sections will discuss how lights and materials can be used within our game worlds.
2. Types of Illumination
A number of different types of
illumination are available to shine onto our objects. Any or all of the
illumination types can be applied to XNA's lighting model, and the
color of each type of illumination can be specified independently.
Let's take a look at each of the illumination types that a light can use.
2.1. Ambient Light
The simplest type of light is ambient light,
which is light that comes from all directions at once and falls equally
on to all parts of each object rendered. It is completely flat in
intensity, leaving no bright or dark areas on the objects that it
illuminates.
In the real world, the
closest analogy to ambient light is the light that is reflected from all
the objects in the environment. If you are in a room with a single
light source, those areas of the room that are not in direct line of
sight from the bulb still receive some light from their surroundings.
This is the illumination that ambient light seeks to simulate.
When an ambient light is present, all vertices will be equally lit by the appropriate ambient light level.
An example object illuminated with ambient light can be seen in Figure 1.
The figure shows a 3D cylinder with a medium-intensity ambient light
applied and no other lighting. Note how the object appears just as a
silhouette: no variation of light intensity can be seen anywhere within
the object.
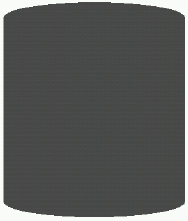
XNA's default ambient light is black, meaning that no ambient light appears within the rendered scene at all.
2.2. Diffuse Light
Diffuse light
is reflected by an object based on how the object is angled toward the
light source. If an object is rotated so that its faces are directly
toward the light source, the faces will radiate the light with a high
intensity. As they rotate away from the light, the intensity fades away.
The light is radiated equally in
all directions, so the viewpoint from which the object is seen has no
effect on the intensity of the lit surfaces. This is how an object with a
matte surface would behave in the real world, as opposed to a
reflective surface that would reflect more or less light depending upon
the observation viewpoint.
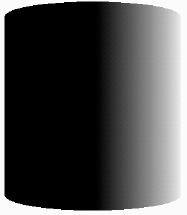
An example object illuminated with diffuse light can be seen in Figure 2.
The figure shows the same cylinder with a bright diffuse light situated
directly to its right. Note that the object illumination increases as
the object surface becomes more directly angled toward the light source.
2.3. Specular Light
Specular light
is also reflected by an object based upon its angle with regard to the
light source, but this type of illumination radiates light more like a
mirror: light is reflected from the surface based on the angle of the
surface relative to the viewer and light source.
If the light source is in the
same location as the viewpoint, and a surface also faces directly toward
the viewpoint, the specular light will radiate intensely. As soon as
the surface rotates away from the viewpoint, the specular light will
rapidly fall away. If the viewpoint and light source are in different
locations, those faces that are angled directly between the two will
radiate light most brightly, just as a mirror would.
This behavior allows objects to be given a "shine" or "highlight" that can make for very realistic looking objects.
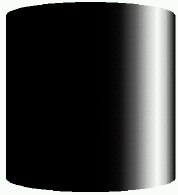
An example object illuminated with specular light can be seen in Figure 3.
The image shows the same cylinder with a bright specular light situated
directly to its right. Note that the object illumination increases as
the angle of the cylinder reflects our viewpoint toward the light, where
the surface of the cylinder is at about a 45-degree angle from the
viewpoint. As the surface deviates from this angle, the light intensity
rapidly drops away.
3. Material Properties
Just as lights emit
different types and intensities of light, so can objects reflect
different types of light in different colors. For example, a red object
in the real world is red because it reflects any red light that falls
upon it, and absorbs the green and blue light.
In XNA we can set the color and intensity of light reflected from each individual object by setting the object material.
Just as each light can have different colors for ambient, diffuse, and
specular light, so we can define the intensity and color that objects
reflect for each different type of light.
Let's take a look at the
different material properties and then we will examine exactly how
lights and materials interact with each other.
3.1. Diffuse Material
As the material's ambient
property controls the amount of ambient light reflected, so its diffuse
property controls the amount of diffuse light reflected. This can be set
to white to reflect all the light that reaches the object, or it can be
changed in order to absorb and reflect different elements of the color
instead.
3.2. Specular Material
The material's specular
color controls the amount of specular light that is reflected from the
object. Setting the material's specular color to white will reflect all
specular light that arrives at the object, whereas setting it to black
will absorb and therefore completely disable the specular element of the
light, preventing any shine effects from displaying on the object.
In addition to controlling how
much of the specular light is reflected, XNA also offers control over
the focus of the specular highlight. Low specular power values (values
up to around 4 or 5) will result in a very soft specular component,
reflecting lots of light back. As the value increases, the specular
light becomes more and more focused, requiring faces to be angled more
directly toward the light source before any reflection is made. There is
no specific upper limit for the specular power value, but as it begins
to reach into the hundreds, its effect becomes so slight that the
specular light effects begin to disappear.
3.3. Emissive Material
The final material property allows us to set an emissive color.
This property is used to specify a color that is then simulated as
originating from the object, allowing it to have its own illumination
independently of that of the lights around it.
Normally if an object has no
light shining on it, it will appear completely black, but emissive
colors allow the basic object color to be set even when it is not
illuminated by any light at all.
It should be noted, however,
that rendering an object with an emissive color set does not make the
object into a light source itself. It will not add any light to the rest
of the scene or cause any other objects to be illuminated in any way.